How to Prevent Ski Injuries – Part Two
Prevent Skiing Injuries (Part Two)
In Part I of our series regarding injury prevention for skiers focused on proper equipment and properly warming up before hitting the slopes. Today we will provide you with a simple “pre-season” conditioning program to strengthen and tone up specific muscles that are used more frequently to alpine ski.
While alpine or downhill skiing uses a majority of the muscles in your body, it is obvious that the majority of the stress is on the lower extremities and core / abdominal muscles. Your knees, hips, and ankles are constantly flexed (mini-squat) position and are frequently absorbing energy as the terrain changes (moguls, ice to powder, etc.). Changing directions and turning require you to shift your weight from one ski to the other as well as lift the skis and rotate your hips and torso. Lastly, your arms and shoulders get a workout with pole planting to turn sharply as well as propel you when you are on flat terrain or when you need to climb up a short incline. It is clear to see that skiing is a physically exerting sport yet very few skiers prepare themselves properly. Hopefully this simple home program can help!
The focus of this program is to strengthen the muscles that will be stressed the most when out on the slopes. This program is also designed to be done at home as no weights are required and should take about 45 minutes to complete. I would recommend performing this exercise program 2-3 times per week for 4 weeks prior to skiing. I would also recommend warming up by doing the warm-up routine previously discussed in Part I but without the ski gear on.
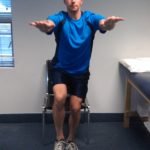
Body Weight Jump Squats: Standing with hands behind your head and feet shoulder width apart, flex your hips and knees and then explode up and jump as high as you can ten times without stopping. You want to focus on landing softly, forcing you to flex your hips and knees with each landing. Perform 3 sets of 10 jumps with 60 second rest in between each set.
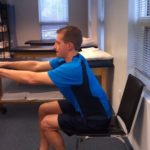
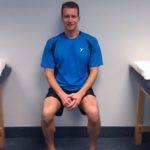
Single Leg Squats (into a chair): Stand on one leg with a chair behind you. Sit into the chair with just the one leg but stand right back up when you butt touches the chair. Make sure you keep your chest up and sink your hips. Perform 3 sets of 10 reps on each leg alternating sides every 10 reps. You may take a 30 second rest between each set.
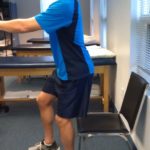
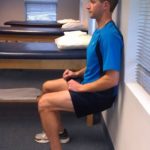
Phantom Chairs: Stand with your back against a wall with your heels about 18 inches away from the wall. Slowly lower your body by sliding down the wall until your thighs are parallel with the floor. Hold for 30 seconds and then rise up to rest for 30 seconds. Repeat this exercise 4 times. If you find this is not challenging enough, then try to increase your hold times to 45 or even 60 seconds.
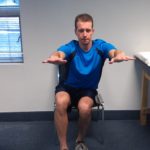
Single Leg Sharks: You should stand tall on one leg and then flex your load bearing hip and knee to lower you down about 6 inches. Holding that position take the free leg and tap the ground in front of you, out to the side, and then behind you with the foot. You will repeat that process 10 times and then switch legs. Perform this exercise 3 times on each leg.
Leg lifts (and lowers): Start by lying on your back and then flex your hips and knees but keep your feet flat on the ground (like you are getting ready to perform sit-ups). Tighten your abdomen by sucking your belly button in towards your spine and raise your knees towards your chest. Then straighten your legs and slowly lower them back to the ground keeping your abdomen tight and sucking in your belly button. Perform 3 sets of 10 reps taking a 60 second rest in between.
V-ups: Start by lying on your back with your arms extended over your head and your legs straight but slightly spread. If available have a soccer ball in your hands (If not a pillow is a good substitute). You will then simultaneously raise your arms and legs until you can pass the ball from your hands to between your ankles and lower down to the ground. Repeat the same motion in reverse passing the ball from your ankles to your hands. Perform 3 sets of 5 reps. You may increase the reps to 10 if it is getting easy.
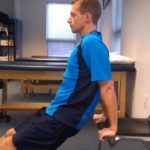
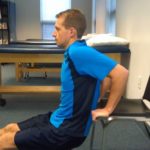
Tricep Dips (Do not perform if you have a history of shoulder pain): Find a stable chair in your house and sit at the edge of the chair with your legs straight out in front of you. Place your hands on the chair jut out side of your hips. Gently slide your but off the chair so you are supporting your remaining weight on your hands. Slowly lower your body down by allowing your elbows to bend behind you and then press back up to the extended position. Perform 3 sets of 10 reps.
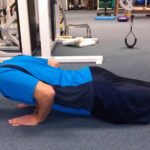
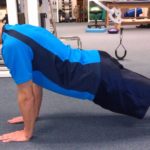
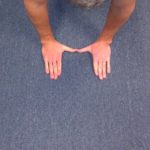
Close grip push- ups (For those who cannot perform Tricep Dips): Start in the classic push-up position with your hands at shoulder width and elbows fully extended. Spread your thumbs so that they are pointing at each other and then slide your hands towards each other until your thumb tips touch. Perform 10 push-ups in this hand position and make sure you keep your elbows tucked close to your body if possible. Perform 3 sets of 10 reps. You may increase the reps if necessary.
I think you will find this program challenging and helpful in preparing you physically for downhill skiing. The recommended sets and reps are a guideline. For those of you who do not exercise regularly, you may need to decrease the reps or sets initially and then work your way up weekly. Hopefully, this will help you avoid injuries on the slopes this winter. If you are one of those unfortunate skiers that does injure themselves, contact our highly skilled staff so we can get you back out on the slopes as soon as possible!